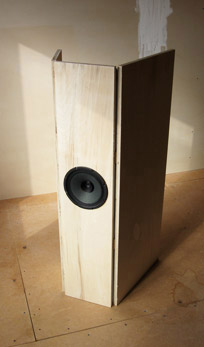
PROJECTS – BASIC BETSY OPEN BAFFLE
As far as I know, the idea for this folded baffle design originated here, in a thread Dan Mason started over at Audio Circle.
There are dozens of ideas in that thread. Here is the design I use. You can build this in an apartment in less than two hours (well, if you don’t finish the boards) with no power tools (a power drill sure is easier than a brace and bit). It sounds great too!
MATERIALS:
Plywood or MDF: one 3/4″ sheet (4’x8′) ripped into 2 pieces each 4ft by: 9″, 10″ and 18″
Hinges: either 8 2-3″ basic hinges (or 4 – 48″ piano hinges if you want to get fancy)
Cork: enough to cover the back of the OB, if you choose to apply it
Tape: gaffers or duct (not needed if you spring for the piano hinges)
Screws: for mounting the drivers
Weatherstrip: closed cell for driver gasket
Female Disconnects: to connect wire to drivers
Wire: twisted 18-24g solid core
Wood finish: if you choose, something one-step seems appropriate
Glue: if you apply the cork
See: Parts Notes
TOOLS:
Drill – for pilot holes for driver mounting screws
Screwdriver
Saw, router, or someway to make the driver hole
Sandpaper and rags (if you are finishing them)
Drop cloths or garbage bags (to catch the dust if you are inside)
Boxes, sawhorses, stacks of books, or someway to get the boards of the ground when cutting the holes
CONSTRUCTION:
- If you haven’t got the means, find a lumber source that will rip the wood for you.
- Cut a 7 3/8″ hole a little (2″) above the center of the narrowest board. I use a rotozip. You can also use a jigsaw or router. But, you could just as easily cut the hole by hand. You’ll need to drill a big enough hole to get your saw in.
- If you are using cork, glue it to the back of the boards.
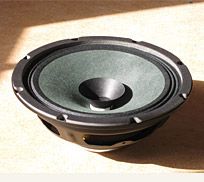
- Center one of the drivers in the hole and mark the mounting screw locations
- Remove the driver and drill the pilot holes (or use T-nuts).
- Lay the board face down and position the 10″ board next to it. Position two hinges (or one piano hinge) between them. Mark the screw hole locations
- If you don’t want to drill through the face, be sure your screws are not longer than 3/4.” Use tape around your drill bit to mark a depth of 3/8-1/2″. Drill pilot holes for the hinges.
- Repeat this process for the 18″ board (on the other side of the center 9″ board.
- Finish the wood, if you want.
- Then, lay down the hinges and assemble the baffles.
Stand the baffles up. If you used tape, adjust the wings to ~45 degree angles and seal the gaps with tape. - Apply the weatherstrip to the backs of the drivers (next to the basket, you want it to be air tight).
- Install the drivers. Don’t overtighten! The screws should be barely snug, they’ll sound better that way!
- Crimp the disconnects to your speaker wire, then hook ‘em up and enjoy!
PARTS NOTES:
Plywood or MDF: Quality is not as critical as it is with resonant enclosures. MDF will work fine, but it is pretty toxic. I used a $40 sheet of ply from Menards (they don’t cut it, I hauled 2 4×4 sheets home strapped to my car’s bike rack). It is fairly void free with a decent enough face veneer. The back is unsanded. You can use AC grade if you are allright with the look. Avoid Home Depot’s “Cabinet Grade” or “Birch Ply” etc. It is loaded with voids. I’ve heard Lowes has good stuff, but I don’t have one near by. Really good ply will look nice, but set you back considerably more.
Screws: Get something that you like! The heads must have a flat bottom. Coarse threads are best. Often you can find suitable black screws that are sold for use with sheet metal. Wood screws don’t typically have flat bottoms.
Weatherstrip: 1/4-3/8″ closed cell, thick is good
Wire: My Home Depot sells plenum grade Cat 5 by that foot. (Be sure you get plenum grade, so you get Teflon and not yucky PVC insulation). Buy however much you need for one side (10ft total for a 10ft pair). Strip the cable apart (there will probably be a thread you can use to rip the jacket off). Then use one twisted pair for each side. If you must have bigger cable (you don’t need it, trust me), go to Radio Shack and get two colors of 18g solid core hook up wire. Twist them together (a drill and vise work well).
Glue: If you are applying the cork outside, 3M Spray 77 works really well. Inside, try some contact cement.